
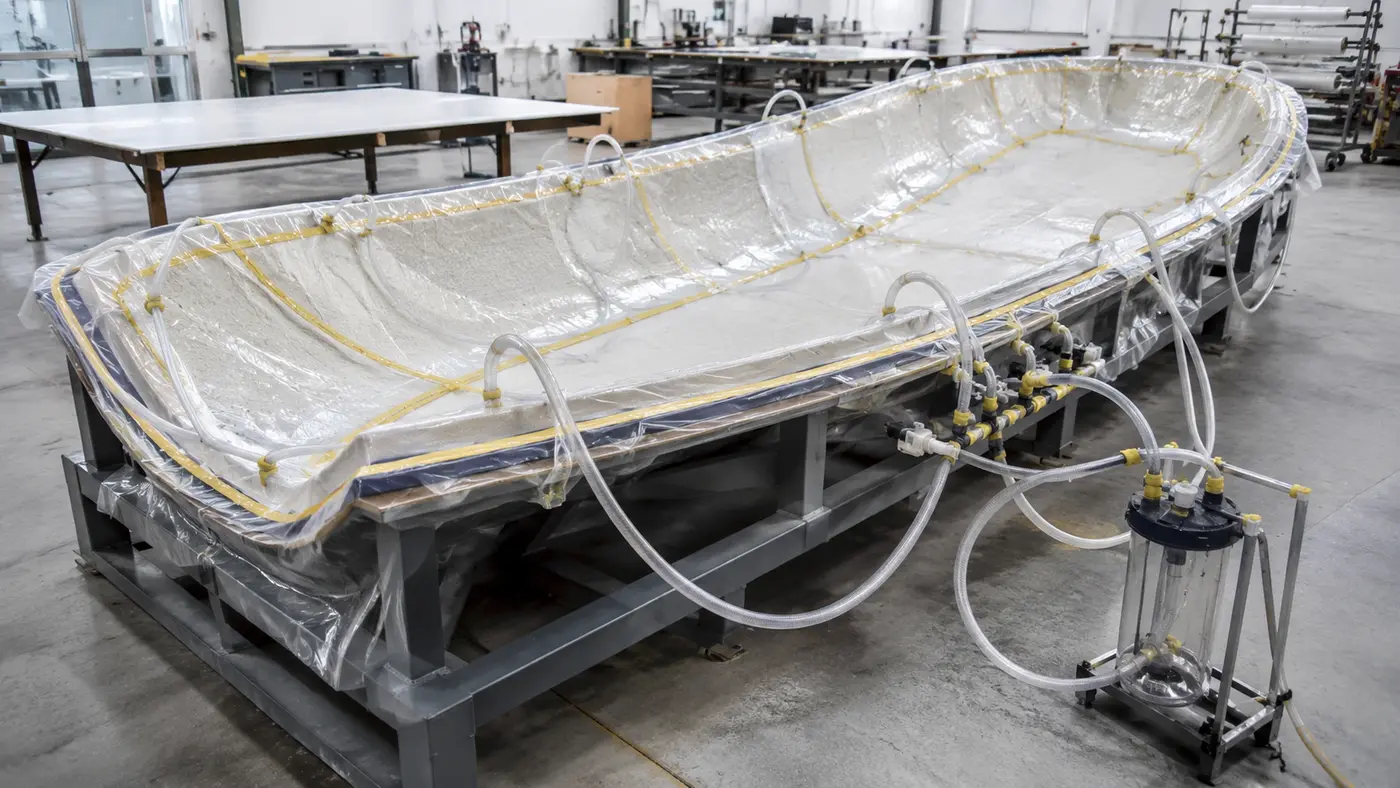
Vacuum processing creates uniform compaction across a laminate, removes trapped air and helps control resin content in composite structures. Once the bag is sealed, the pump evacuates the enclosed air and atmospheric pressure outside the bag presses the material stack against the mold. Process performance therefore depends not only on pump capacity, but on the integrity of the entire sealed system—from the mold surface, bagging film and sealant tape to fittings, hoses and the resin trap.
How do vacuum bagging and vacuum infusion differ?
In vacuum bagging, the reinforcement is normally wetted with resin by hand lay-up, prepreg or another process before the bag is closed. Vacuum then consolidates the laminate, removes air and transfers excess resin into a bleeder layer. This is a practical option for manufacturers seeking better laminate quality than conventional hand lay-up without completely changing their production method.
In vacuum infusion, dry reinforcement is placed on the mold and sealed under the bag before resin enters the laminate. After the system passes a leak test, the pressure differential draws resin from a feed container through the reinforcement toward the vacuum line. Infusion can provide more consistent fiber-to-resin ratios, lower operator exposure to resin and efficient production of large parts, but it requires careful flow planning and gel-time control.
Where compaction pressure comes from
Vacuum does not mechanically “suck” the laminate onto the mold. The actual compaction force is produced by atmospheric pressure acting on the outside of the bag. At sea level, the maximum theoretical pressure differential is approximately 1 bar. Actual shop vacuum will be lower because of hose losses, elevation, pump capability and system leakage. A gauge at the pump alone is therefore insufficient; vacuum should also be monitored near the mold, and the bag should be checked for its ability to hold vacuum after the pump is isolated.
Understanding the consumable stack
The reinforcement is placed on a mold that has been properly cleaned and treated with a compatible sealer and release agent. Peel ply leaves a clean, textured surface for secondary bonding or further processing. Release film controls resin passage and facilitates removal of the upper consumable layers. Infusion mesh distributes resin rapidly across the laminate during infusion, while breather/bleeder provides an air path and absorbs excess resin during vacuum bagging. Bagging film and sealant tape form the airtight envelope; spiral tubing, connectors and hoses distribute resin or collect air according to their position in the system.
These materials are not interchangeable. An unsuitable release-film perforation, an overly fast flow mesh or a discontinuous breather path may cause dry areas, excessive resin content, consumable print-through or difficult removal after cure.
Basic vacuum infusion workflow
Begin with a clean mold and apply the specified mold sealer and release system. Lay up the dry reinforcement, peel ply, flow mesh and resin-feed and vacuum lines according to the flow strategy. Seal the bag with sealant tape and create pleats at corners and changes in geometry so the film can conform without stretching or bridging.
Pull full vacuum and complete the leak test before mixing resin. Once the system is stable, prepare the required resin quantity, control resin and mold temperature, and begin infusion. Observe the flow front and prevent air ingestion or resin carry-over into the pump. After the laminate is completely filled, clamp the resin lines in the planned sequence and maintain vacuum until the resin has gelled or cured to the level specified by the resin supplier.
Flow design and resin working time
The laminate must fill before resin viscosity rises significantly or gel begins. Flow rate is affected by resin viscosity, temperature, reinforcement permeability, laminate thickness, flow-mesh selection and the spacing between feed and vacuum lines. Opening too many resin lines at once may create an uncontrolled flow front. Placing a vacuum line too close to the feed can cause race tracking, allowing resin to reach the outlet while other areas remain dry.
For large or geometrically complex parts, run a representative trial and record fill time, resin temperature, mold temperature, gel time and resin consumption. Production data from the actual material stack is more reliable than relying on a generic infusion diagram.
Leak testing before infusion
Air leakage is one of the most common causes of voids and dry areas. After reaching the target vacuum level, isolate the mold from the pump and monitor vacuum decay over a defined period using an internal acceptance standard. If vacuum falls too quickly, inspect the sealant-tape perimeter, bag pleats, fittings, valves, hoses and mold surface in a systematic sequence. Resin should never be used to “self-seal” a leaking bag, because the defect may return during cure.
Common defects and likely causes
Dry spots are commonly associated with blocked resin flow, flow mesh ending too early, excessive compaction or resin gelling before fill is complete. Voids may result from leaks, dissolved gas, aggressive mixing or a split flow front. A resin-rich laminate can indicate insufficient compaction or an unsuitable consumable stack; resin starvation may result from clamping the feed too early or providing inadequate resin reserve. Bag bridging at corners prevents proper consolidation and often leaves resin pockets or voids after cure.
When should vacuum processing be selected?
Vacuum bagging is well suited to manufacturers that want to improve hand-lay-up quality, reduce voids and achieve more uniform consolidation without moving immediately to a full resin-transfer process. Vacuum infusion is often the better choice for large surface areas, controlled fiber-to-resin ratios, cleaner part surfaces and reduced open handling of resin. The final choice should reflect part geometry, production volume, resin chemistry, reinforcement type, cycle time and the level of process control available on the shop floor.